Sunday, February 12, 2012

Running, Jumping and Singing

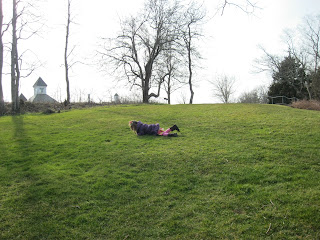
As we pulled into our parking spot at the library, M said "I want to go play on the grass!"  Great, I thought. We had been traveling to visit her grandparents and had been spending a lot of time in the car.

I was very pleasantly surprised by how much fun we had in this slightly hilly park, on a slightly chilly day!  We ran up and down the big hill again, and again and again.


We investigated the tree and gardens that were dormant for the winter.

M found some fallen branches that made great microphones for us.  We used them to sing Christmas carols, while we pranced in circles around the trees.  There were some low boulders scattered about as well, thanks to the glaciers, M was happy to point out.

The big rocks were fun jump launch pads, as well as a perfect spot for singing a tune.

The joy of rolling down a HUGE hill, on damp grass, in  your new coat is immeasurable!

Thursday, February 9, 2012

Number Families, with a four year old

Well, it all started with what I thought would be a very straight forward number sequencing activity.


After M glued down all of her numbers in order, I handed her a marker and asked her to write her name.  She ended up drawing number families.  She drew mommy and baby numbers for each number 1-10.  Sometimes the daddy number was there, but often he was at work.  The numbers each had arms, legs and lots and lots of hair!

Whenever we sit down to do an academic activity, I'm always astounded by how much creativity M brings to the table.  It's a great reminder to make sure that we leave room and time for their creativity in all endeavors.   Even when we think that it's a cut and dry activity.

I'm learning that M always has a story to tell.

Saturday, January 28, 2012

grocery shopping can be fun!

It's kind of a novel idea, isn't it?  Especially if you are taking your little ones with you.  It would be wonderful if our children could help us get this chore done, and learn something in the process, wouldn't it?


Magntic fun!

Magnets are Fasinating!

Who hasn't gotten sucked into a slightly meditative state by the push and pull that is possible with magnets? I bought a set of magnets from amazon, after seeing someone paint with magnets on plexiglass! (I'm sorry, I can't find the inspiring picture now!) Seeing that activity sparked a memory from when I taught pre-k. I had hung a piece of plexiglas from my ceiling in the science center for the children to use while exploring magnets. So I quickly adapted that idea to the home. I duct taped a piece of plexiglass, that is usually the painting surface on our homemade easel, between to chairs and told M to slide under.

I put the magnetic balls on top and gave her one of the wands. She had them rockin' and rollin' in no time! A few days later we added paint to the equation. For this project I created edges around the plexiglass to contain the paint covered magnetic balls! This time she sat in front of the plexiglass, while working the magnet under it. This position gave her greater control.

We tried it a few different ways. I squirted paint directly on the plexiglass and she made designs in the paint, that we then made a print of. Then we put down the paper first with a squirt of paint, a circle works well. They are almost guaranteed to move enough paint with the magnets to feel successful.

Magnets are not just for the refrigerator any more! What ideas do ou have to extend magnetic play?

Friday, January 27, 2012

Dot to dot remix

Last week I saw the giant dot to dot that they did over on http://www.momandkiddo.blogspot.com/ and fell in love! M has been on a coloring book marathon for months and there are always dot to dots and mazes in them. But they are too small and too complicated for her to do them successfully. No one is going to work that long at a task that is way too hard for them. Especially our children! We need to set them up to succeed.

I cut a big square from our newspaper end roll and made her a basic 1-12 dot to dot. She loved it! Plus I taped to the wall for an added extra 'this is differnt' factor. When she was done she wanted her doll house babies to come check it out. The big sister rode her tricycle on the road M made, and the baby was pushed in her stroller along it.


A few days later I decided to expand on the idea and creat a large maze for her. Again, it was a huge hit! When the maze was completed, M wanted to go back and color the baby who needed to go home. For it he next maze, I was instructed to draw a mommy, a big sister and a baby who needed to get home. After they we safely home, M gave them all beautiful, and extremely long hair!

It's fun to play and learn outside the box, you never know what will happen.

How do you set your child up for success?

Thursday, January 19, 2012

Splatter It!

I wanted to have a new tablecloth to use for school days and for our art class.  I wanted the little ones in our Homegrown Preschool to create it for me.  I went to the thrift store and bought a plain white, twin flat sheet.  I brought it home and bleached it.  Now it was ready for the kiddos to paint it for me.


I remember learning about Jackson Polluc in college.  I was struck with his method of painting.  He would fling, flick, and pour paint on his canvases.

Who would love doing that more than a bunch of preschoolers?  So that's what I set up for them.  I put out many colors of slightly water downed acrylic paint and paint brushes.  I spread the sheet out on the grass and showed the munchkins how to fling the paint onto it.


Needless to say, they loved it!  The end result was beautiful, and after each art class a little more beauty will be added to it.

Tuesday, January 17, 2012

So you think you know messy....

My daughter LOVES to be messy! She is never happier than when she is up to her eyeballs in messy fun. Yesterday we played with goop. 2 parts cornstarch, and 1 part water. It acts like a solid and a liquid, depending on the amount of force. You can scoop it up into your hand and then watch it dribble back into the bucket. It's really fascinating. M added some liquid watercolors to it with eye droppers.
 Oh yeah, and it also is very cool with one of your frozen water balloons.   You just never know where an out of the box activity will take you. 


Today was progressively messy. We drew quick pictures to go put out in the rain and watch what happens to the colors.


Then M played with the half melted frozen water balloons. She added them to her half melted wheel barrel.

I suggested she send the ice down the slide. The ice became a mommy, and then a mommy and her baby when it broke.


Then it was off to check out the mud puddle ice rink, it was completely melted. I decided to rake out the puddle a bit, so there would be less leaf debris to deal with the next time it froze. We just had to maximize the slipperiness of it all. It was not long before M was filling a bucket to refill the wheel barrel with muddy water. Then there was puddle jumping in her fuzzy boots, her rain boots had already been soaked. Shortly there was mud play happening. Gloves don't get to look this way by playing in the snow! It was all fun and games until she got mud in her eye. Needless to say, she is enjoying her third bath of the day.


Sunday, January 15, 2012

Outside the Pizza Box!

There is no Pizza Hut on our little island, so tonight we are cooking outside the box! We had the wood stove going nice and hot, so M and I decided to cook our pizzas on it.

I preheated our cast iron pots for a few minutes. Then I put a whole wheat tortilla in each to toast them on both sides.

I preheated the sauce and my toppings in the microwave. M played chef and put together our pizzas.

Back to the woodstove we went. In just a few minutes we had hot, crispy pizza for dinner, no box needed!

Friday, January 13, 2012

Adventures in a Vegan Kitchen

So today I decided that I would try a couple new recepies. About a month ago my husband and I went Vegan. I'm mostly doing it to support him. After watching Forks over Knives it was hard not to. Anyways, we have both been enjoying it and have not missed meat. I personally still have some cheese and ice cream.

I enjoy baking with my little one. So today I decided to try to make Baby Cakes' blueberry muffins and chickpea chocolate chip cookie balls from purplebirdblog.com The muffins came out well, but M spit it out! Argh... Blueberry muffins are her favorite. The only big difference was that I used Bob's Red Mills GF Baking Mix, like the recipe called for. My husband and I liked them though. Maybe M will come around.


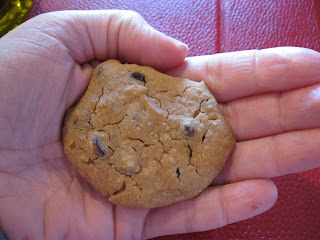
My next adventure was to attempt chickpea cookies. After the muffin flop (in terms of getting M to eat it), I didn't hold out much hope for bean cookies....but they are great! I have never before 'peeled' a chickpea, but I wanted to ensure a smooth cookie. I used the PBB's recipe as a frame work. (I added too much almond milk, so I never got a stiff dough that could be rolled into a ball like she did)

Here's what I used: 1 can chick peas- peeled
1 can of navy beans
1/2 cup coconut oil
3 TBS of the GF baking mix, I had to add 2 extra TBS because I added too much almond milk
1/3 cup of maple syrup
1/2 tsp of salt
3 tsp of vanilla extract
1 cup of chocolate chips (enjoy life brand)
 A drizzle of almond milk

I had to bake them at 400 degrees for 20 min They look a lot like 'regular' chocolate chip cookies. You would never know that they are made with beans! Granted, M won't even try it... tomorrow perhaps.

Thursday, January 12, 2012

Designer babies

Now, when I say designer babies, it's probably not what you think. I mean my daughter likes to make clothes for her babes. She is only four and since September, tape has been her best friend. She has cut magazines apart to redress her doll house people, as well as redecorate their house.


She has used scarp fabric from my sewing projects to make a birthday outfit for Amelia. She used some foam stickers to not only decorate the fabric, but to hold it together. She did this all on her own.

I took her to Plimouth Plantation in October, with some of her homeschool friends and her auntie. It was a fantastic trip, and I highly recommend it to anyone who is in the Massachusetts area. She is still talking about it months later. One day she decided she wanted the babies to be Pilgrims.

She cut the rim off of a paper plate to make the hats for the girls. After applying copious amounts of tape the babies were dressed and ready to set sail! Actually she was having them build their house. 

What can your little one do with some paper, tape, and maybe some fabric? Set it out and find out!

Wednesday, January 11, 2012

Ice Hunting!

The temperature dropped below freezing over night. Quick! Let's go on an ice hunt.

We went out armed with her new magnifying glass to investigate. The first spot we checked was the large mud puddle in the driveway. We struck the ice jackpot! Not only was there ice in the puddle it was thick enough to hold her weight. M was so happy to twirl, glide and slide on her own personal ice rink, that I thought we would have to wait for it to melt before she'd stop.


When she had finally had her fill, and with the promise of a cup of hot chocolate, we headed into the house. What did I see? A small red wheel barrel that had a frozen hunk of ice in it! Ah ha, a perfect ice sensory bin for Miss M! I have seen a number of different preschool blogs post about putting their water tables outside to freeze, and then bringing them in for exploration. We don't have a water table, so I didn't give it much thought. The wheel barrel was such a perfect substitute for us, I couldn't pass it up. FYI you could also just put a plastic storage tub outside when a cold snap is headed your way.

We had a quick cup of cocoa and then it was on to more ice skating. Only this time it was M's babes that were skating.


As it started to melt we got out some small wooden mallets, that I picked up at a thrift store. I had originally planned to use the mallets with her and some play dough. I'm happy to say that they also worked very well for breaking up ice. I'm very glad that I'd put down towels, as the ice chips started to fly. Safety glasses wouldn't have been a bad idea either. We hacked and picked until we had freed a leaf that was trapped within the ice. *good idea for next time, put small natural items or toys in the water to be unearthed after it freezes.*


When we were done, I added some more water to the wheel barrel and placed it back outside for some more chilly fun another day.

As a side note, we also blew some bubbles while it was below freezing.  On sciencemadefun.net they say that the bubble will shatter when it lands.  Ours did not shatter, they acted more like plastic wrap.  The bubbles floated through the air and as it traveled, it froze.   You could watch the color change from transparent to a milky white as it froze.  When they landed, the air slowly leaked out.  It was very interesting, and we will be doing it again.

Have fun outside the box!

Tuesday, January 10, 2012

Does it squish?

I have been having children paint with their feet since I first taught kindergarten, and we read The Foot Book by Dr. Seuss. I always did it the same way until earlier this week. I used to have the children sit in a chair, I would sit on the floor, and I would use a paint brush to paint their feet. It was always fun, and the new sensation of the brush on their foot was giggle inducing. But boy oh boy was it labor intensive, and messy! I was always covered in paint by the time we were done. The the smart ladies over at Play At Home Moms posted a picture where the child stood in a small tub of paint. Brilliant!

A few days ago this is just what we did. I had it all set up and waiting for M in the kitchen when she woke up.

I put down a waterproof table cloth, covered that with a twin sheet that our Homegrown Friends splatter painted, in September, a la Jackson Pollock. The final layer was a large sheet of paper that I cut from the 'end roll' from our local newspaper. (free! One company's trash is another mom's endless supply of painting paper!) I taped the paper down, so as to lower the frustration level. The paper never lifted up, tore, or got crinkled. There were also some "art towels" set out. I set out 3 small bins and let her choose her paint colors. We used our washable tempra paint from Discount School Supply, that we use for most of our painting.

M had a blast stepping into the paint and squishing paint between her toes. She Requested some 'grooving' music' so that is what I picked out on Pandora, a little 90's Pop.


She danced and twirled her way to a masterpiece. We filled the bucks a few times with the same colors, and then rinsed, washed and repeated with a new set of colors and a fresh piece of paper. It evolved into hand painting, which was quickly followed by tummy painting. I drew the line at hair painting and making 'paint angels'. All of this squishy fun was followed by a bath.

I am happy say that I was much cleaner than usual after this activity, and M was WAY messier! She was pleased to have been in total control over color choice for her feet, she often double dipped her feet. It was a very enjoyable way to create outside the box.
~Note, the paper right near the paint buckets gets very saturated and becomes very slippery. After M fell once we used more caution, especially in the 'paint loading zone'. Moving the paint buckets to the other side of the paper half way through the project helps to cut down on the slip and slide aspect.

Monday, January 9, 2012

I'm a really good stealer...

This is what I always told my students' parents when they would ask me where I came up with my ideas. There are so any creative people out there! Now, more than ever their fabulous ideas are more accessable than ever.

I am now a mom to a wonderfully creative 4 year old daughter M. Before she was born I was an elementary and preschool teacher. In college I made a snake with some students out of tube socks sewn together and dyed with food coloring! 'The Day Jimmy's Boa Ate the Wash' was a memorable story for all of us after this follow up activity. Learning outside the box is almost always more fun.

I have been a student of other people's wonderful ideas for as long as I can remember. I look through craft books, read blogs, thumb through magazines, and walk the aisels at craft fairs like I imagine a chef reads recepies. I use them as a starting point, as a reference for techniques, as a way to get inspired. As with a recipe that has been modified, sometimes it is hard to know who to credit for the product. Any time it is possible, I will credit the proper people for providing the inspiration behind a project. We each bring a unique history and set of skills to each task that we undertake.


Here's to living and learning outside the box, and making an idea your own special experience!